CLICK HERE FOR THOUSANDS OF FREE BLOGGER TEMPLATES »

Friday, November 7, 2008

*Martha, Martha, Martha!*


Halloween Spooktacular Cake:
2-tiered round marble cake (base 12", top 10") with chocolate buttercream icing covered in chocolate fondant. Cake topper- chocolate cookie house with melted LifeSaver windows, tree and tombstones, cocoa powdered nougat steps, shaved chocolate covering, gummy spiders and assorted chocolate embellishments. Brown royal icing "marbles" around base and top tier.

Yes, the day had finally come where Martha and I would duke it out in my kitchen and was this ever a battle of epic proportions! I have always been a fan of Martha, admiring her for craft and kitchen talents that can only be obtained by someone who has the freedom and the $avings account to reign as Queen Bee of Domesticality. I'm not bitter, in fact, I'm pretty sure that with my frequent trips to Macy's home store and the impulse pick up of her eye-catching magazines in the supermarket, I've contributed quite a lot to her ever growing empire.

But up until now, I had never really tackled a project of hers, mainly because I'm fully aware that it's really not Martha, but a whole army of kitchen wizards that make her mouthwatering masterpieces worthy of the Martha stamp of approval. And I, am very much on my own.

I was already in full admiration of this year's October issue with the promise of great Halloween ideas, particularly the edible goodies that dominated the pages. And then I got the email...

My former classroom room mom was throwing a huge Halloween party for her boys' school friends and families and was hoping I would provide a "WoW" factor for dessert, she had found a cake she would like from a magazine....
Praying it was not the 2-tiered spooktacular I had seen in Martha's mag, I hoped for the best and asked her to send a picture of the magazine cake. Wouldn't you know it, it WAS that 2-tiered cake! So after a minor fainting spell, I picked myself off the floor and replied with an exuberant, YES!

Me and Martha, Domestic Diva vs. Pastry Peasant...two will enter, only one will survive!

I severely underestimated the challenge before me, and have now vowed that this is the only time this cake will be made with these two hands. Of course, she was thrilled that this was a special, one of a kind, never to be made again cake for her amazing party. If only I had taken a picture of her house, now she knows how to decorate!

So here's how it all broke down:
*The cake was originally buttercream, I thought it best to cover in chocolate fondant, first because there would be a multitude of kids there with hundreds of fingers and second because I LOVE CHOCOLATE FONDANT! (please see August Bridal Shower cake) Covering it in fondant would not only ensure it arrived safely, but would stay pretty during the party.

*I wanted to add a little fun to the cake so I located a marble cake recipe from Martha's website which was sturdy but moist and flavorful. I added orange food coloring to the vanilla portion to up the spooky factor.

*It listed nougat or torrone as the edible material for the steps that creep up the cake walls...after 3 cake stores, I still don't know what torrone is, nor does anyone else apparently. So reaching into my Halloween bag of tricks, I remembered that 3 Musketteers bars are made of plain nougat so I opted for that. After spending an entire night cutting away the chocolate of an entire bag of candy, it turns out there isn't a whole lot of nougat in those little "fun" sized bars-who knew?

*The cookie topper is probably to blame for my never wanting to re-create this cake ever again.  You make the dough, you chill the dough, you let the dough become room temperature (HUH?) you cut out the dough, you chill the dough again, you cook the dough...AAAHHH!!!  And then, they want you to make caramel on the stove to pour into the cookie house windows, and that's where I put my foot down! Having done stained glass cookies last December, I knew full well, I could crush up some LifeSavers and melt them as the cookie baked-so take that Martha! I won't even talk about the sunflower seed roof....

*I did enjoy making chocolate embellishments with my chocolate melting pot and a new larger squeeze bottle. Spiders, spider webs, tombstones drawn on parchment paper and left to cool can be gently pried off and used as decoration. An added bonus-if you mess up or make too many, you get to snack as you work!

*This cake was also bringing me to a new frontier, it was 2-tiered! I do have a sort of 2-tiered cake in my pastry past, however it was a much smaller spongy cake on top of a heavily buttercreamed cake (see Vroom-Vroom) so I don't really count that. This was an honest to goodness 2-tiered cake that would need supports. I have 3 cake supply stores at my disposal not to mention Michael's and Tall Mouse craft stores, but I had never found supports like those super-sized plastic straws on Ace of Cakes-they looked so easy to work with. So I ended up with a set of Wilton cake supports that would need trimming. And by trimming I mean sawing and hacking into. But they did their job, so I'm happy enough. Hopefully I'll have more time to research where Charm City gets their supports before my next multi-layered cake!

So a day and a half mixing, baking and prepping the cakes, another day making buttercream, frosting and covering cakes in fondant, a day making all those ridiculous cookie accents and chocolate decorations and another day or so of preparing all the details and packing up everything I would need should a disaster occur while en route, this cake was on it's way! After about 2 1/2 hours of putting it all together at the party house, the cake was finished and I was elated! We both went into a picture taking frenzy and I finally convinced her that yes, she needs to cut into this cake and enjoy it. 

I do always find it funny, when people react so strongly to a cake like that, because the whole point is that hidden behind this visual gem is a decadent work of culinary art! It doesn't make any sense to make food pretty if no one wants to eat it-if anything, it should taste even better than it looks!

Happy Halloween!

*Beautiful Bugs*


Beautiful Bug Cookies:

Toll House chocolate chip bug-shaped cookies ("cakey" recipe) dipped in yellow, pink, red & blue chocolate with green and dark chocolate details, decorated with sanding sugar.


With the success of the French Poodle bone cookies (see November posts), two other former students who share the same birthday wanted pink butterflies for their school birthday treat. Luckily, I already owned the Bugs mini loaf baking pan from Williams-Sonoma which had butterflies, bees, ladybugs and dragonflies. This project was going to give me even more experience working with my chocolate melting pot and see if I couldn't perfect the art of chocolate covered chocolate chip cookies.

This time, I was planning on dunking the cookies into the melting pot, in the hopes of getting a more even coating, rather than pouring the chocolate over the cookie like last time.  Finally, success! This is a much better way of coating something as big as these cookies, so I was happy. The difference between these cookie "bars" and the dog bones was that I thought, why not jazz them up with some sanding sugars? So I went to my decorating vault and found complimentary decorating sugars for each cookie. Again, as this is all fairly new to me, I did learn another valuable lesson: fine grain sanding sugars will just about disappear into melted chocolate and the coarser grain work much better. 

Another extremely important lesson: if you don't want red sugar to turn your hands permanently hot pink, use a spoon! Wearing gloves is not an option because it won't prevent your body heat from warming up the sugar anyway. So now I know!

Just in case anyone was wondering, the ratio of Toll House cookie dough per batch was about 3/4 of a batch to each pan of 8 cookie bars. These bug cookies were on the larger side-almost 50% bigger than the bone cookies. And I did find a "cakey" Toll House Recipe on the Nestle website. If you use the recipe straight off the bag, I found the centers went hollow.

Next up: I take on Martha Stewart!

*Pretty Poodle Treats*


Pink & White French Poodle Cookies:

Toll House chocolate chip cookie "bones" covered in pink and white chocolate with dark chocolate details


A former student was celebrating her birthday with a French Poodle theme with very chic pink, black and white plates (see image).  After scouring the internet for ideas, I really liked the idea of making dog bones and somehow decorating them.  Finding dog bone-shaped "mini loaf" pans was difficult and I finally had to order them through a website for dog items. They were just the right size and the cookies turned out great.

And then it was time to decorate...

This was not my first time using my new chocolate melting pot, but since these bone cookies were considerably larger than the Oreo cookies I had dipped earlier this year, I wasn't really sure how to go about it. I finally decided since their shape was fairly smooth, it would be easier to just pour chocolate over each bone. Well, you can imagine the mess! But, in all honesty, they turned out well and I figured for my first try, things could only improve from here. 

After the outer layer was completely cooled and hardened, I went about adding decorative details and French sayings to add a little va-va-voom. I did this by pouring melted dark chocolate into the tiniest squeeze bottle (perhaps a bit too tiny) and set out decorating the tops. This was quite a learning experience...the miniature size of the bottle meant that the chocolate that waited in the top didn't stay warm, i.e. liquid, so it was a constant battle between me and the squeeze bottle. Now I know to keep the bottle insulated and warm between cookies-I do this by keeping a warm, damp kitchen towel wrapped in foil in a clear baking dish with a lid nearby as a home for the squeeze bottle as I go about decorating treats.

They were such a big hit, I got another call from more former students who wanted the same thing for their bug themed birthday (they share the same birthday and always do their school birthday treat together). I may have even scored another one for a birthday in two weeks, so check back! 

Coming Up: Birthday Bugs & A Halloween Spook-tacular Cake!

Saturday, August 30, 2008

*Setting Sail*


Bon Voyage Cake:
3 layer, half-sheet vanilla red and blue "funfetti"cake with vanilla buttercream, covered in blue fondant, decorated with fondant Union Jack flag, QE2 ship, passports, airmail and suitcases around the border and blue waves with luster dust on the corners

A friend of mine is shipping off to London for grad school this Fall, so I made this cake for her going away party.  It was to feed upwards of 70 people, so it had to be big, but amnesia seems to be getting the better of me when it comes time to deliver and carry these kinds of cakes! Luckily, there were no mishaps and the cake made it to the table without my having dropped it after carrying it from 5 houses down.  

Although she requested vanilla/vanilla for the cake, I was thrilled when she asked if I could do it "funfetti" style, so in going with the theme, I added red and blue Jimmies to the cake batter.  But this was a cake for a good friend, so I had to up the ante, so I proceeded to split the batter into two bowls, adding red food coloring to one and blue to the other and swirling them together in the baking pans. I so wish I had taken a picture of the insides of the cake for you to see! Oh, well, next time!

And yes, true to form, luster dust found it's way onto several pieces-the flag was lightly dusted with pearl, the waves were brushed with blue and periwinkle,  and I painted the passports and the ships accents with liquid gold and silver luster dust (gold/silver luster dust and vodka). It's just not a proper cake without some sparkle!

My next project will be to tackle gum paste, that QE2 replica ship was in fact solid fondant and weighed a ton, so much so that I was afraid to place it on the cake before arriving, for fear it would turn into a reenactment of the Titanic! 

I was so happy to do this for her and so thankful she loved the cake. There's nothing better than a homemade gift, especially one that requires utensils! 

Bon Voyage!

Friday, August 1, 2008

*Little Orphan Annie & Her Dog Sandy*


Annie & Sandy Cupcakes- Rainbow "Funfetti" cupcakes with vanilla buttercream frosting decorated with chocolate balls and sugar fondant with food coloring pen


Annie was the first Broadway musical I saw in San Francisco when I was a kid as it rolled through 'The City' during it's nationwide tour. It's always been a favorite of mine, and I was thrilled to find out our local children's theater group would be putting it on as their Summer show.

Although these performances boast loads of former students, and it's a blast to see them grow up on stage from show to show, one family in particular have always been kind enough to invite me to a performance every season.  Typically, I would arrive with an armful of those plush fabric daisies, the kind you can get at a grocery store or stationary store for the girls as a gift. But as I had been coming to these performances for over 2 years, I figured it was time for me to change it up.

I knew they liked cupcakes because their mom had asked me to make them for the oldest (and my former student) for her birthday last year.  Sadly, I didn't take pictures so they're not here, but they were Red Velvet cupcakes decorated with High School Musical picks.  So I thought cupcakes would be easy enough to transport to the theater.  And having recently purchased a really great cupcake book called Hello, Cupcake! by Karen Tack & Alan Richardson, I was inspired to make a companion Sandy cupcake for the Annie cupcakes.

Although they didn't turn out exactly like the dog cupcakes on the cover, the directions and pictures were extremely helpful and I found the process to be a lot of fun.  

Unfortunately, as the daytime performance went on (and it was a delightful show with loads of smiling, familiar faces!) the theater began to heat up and the cupcakes looked a little disheveled by the time I saw the family afterwards.  They still loved them and started showing them off to other parents from the show, and thanks to that impromptu free advertising, I may have a chance to put a treat or two up on their auction block for their upcoming season!  And although they didn't look pristine at the end of the performance, at least here they are saved for posterity as they looked in my kitchen!

*Bridal Shower in Pink & Brown*


Pink & Brown Bridal Shower Cake- Three-layer, quarter sheet Pink Vanilla "Funfetti" cake with chocolate Jimmies, fresh whipped cream and sliced strawberries covered in chocolate fondant decorated with pink and white hearts and polka dots and a pink bow painted with luster dust.


The bride-to-be was having a small get together, so originally it was going to be cupcakes in her wedding theme of pink and brown.  About a week prior to the event, it was changed to a cake which suited me just fine!  All I knew was that I would finally be able to put to use something that came home with me by accident my last visit to the cake supply store-Chocolate Fondant!
 
I had never even known that there was such a thing as chocolate fondant, especially since my history with the traditional sugar fondant (white) was only about 2 years long.  But  a while back I was purchasing a large amount of fondant, and not being careful, ended up coming home with 1 package labeled chocolate fondant.  This stuff is so cool-like a huge hunk of Tootsie Roll! It's very easy to work with, and smells heavenly!

To break up all the brown and pink, I threw in a few hearts and dots in white, all given that special touch of luster dust.  And what was concealed inside was a light, fluffy vanilla cake, tinted pink with chocolate Jimmies to make a "Funfetti" cake in her colors.  (I'm hoping to add a picture of the inside of the cake once it was cut soon, so stay tuned!) The filling was fresh whipped cream and sliced strawberries.  I love making fresh whipped cream, until I started this adventure into the kitchen, I never dreamed it would be so simple and yet taste infinitely better than the store bought kind.

I think this is definitely a girly cake, not just for all the pink, the cloud-like fluffiness and the shimmer, but for the instant chocolate aroma that fills the room once you open the box-and what girl doesn't love chocolate!

Tuesday, July 29, 2008

*First Communion Cookies*


Hand-dipped White Chocolate Oreo Cookies- traditional and golden Oreo cookies dipped in white chocolate, decorated with white, pink, blue and yellow candy and sugar sprinkles, topped with a royal icing cross decoration and bagged up in a white organza bag tied with a pink organza bow with silver cross


I had been eyeing the new Wilton chocolate melting pot for weeks when I got a request for dipped Oreos for a First Communion celebration for a former student.  Needless to say I was excited, not only for being a part of yet another First Communion, but for having a reason to purchase the afore mentioned melting pot.

I scoured the local bakery supply shops for the decorative crosses that would add that extra touch, and single-handedly depleted their entire stock.  But I needed every one I could get because this was going to be a large party and I wanted to be able to give each guest at least 3 cookies, so it worked out marvelously that they came in three colors, yellow, pink and blue.

It was surprisingly easy to dip those Oreos, although I have to confess, I was concerned about the chocolate cookie "dust" flecking my white chocolate with polka dots.  I found a large pastry brush did the trick to knock off any loose crumbs before dipping.  It did use a lot of chocolate to dip that many cookies so I was grateful that I bought excess chocolate just in case, I ended up with very little left over.  

I did find you have to work fast to decorate with sprinkles, but that it took quite a while for them to be completely cooled enough to move without leaving smudges in the chocolate.  
When it was all put together, I was really pleased by the elegance of the individual bags.  I think they would make a great gift for baptisms, bridal or baby showers, and anniversaries too.  

*Spring Tea Party*


Tea Party- 
Food: finger Jell-o, cheese and butterfly crackers, veggies and fruit, PB&J and turkey sandwiches cut with cookie cutters, pink lemonade with frozen raspberries and chocolate covered strawberries. For the adults, turkey sandwiches and cucumber tea sandwiches, chicken Cesar salad and peach and raspberry ice teas

Tea Pot Cake: Three-layer, teapot shaped vanilla cake with vanilla buttercream frosting in pink and green, decorated with sugar strawberries and daisies

Crafts/Games:  
Flower Hat- Straw hats decorated with wide white ribbon that the girls attached fabric flowers and jewels with "Glue-Dots" for adhesive
Tea Bag Toss-Groups of three tea bags, labeled with matching stickers, multiple crystal cut plastic bowls and cups used for a bean bag toss-type game
Musical Chairs-Set up out doors, used a version of "I'm A Little Teapot" that got progressively quicker in tempo
Pinata- Tea Pot shaped pinata with plastic rings, lip gloss, plastic butterflies, rainbow mini Slinkys, pencils and candy


I was delighted to be able to plan a party again, it had been since last summer when I did the beach party, and I was really looking forward to planning a tea party for 4 and 5 year-olds for a former student's younger sister.  

It was almost like two parties in one, since, due to their age, the parents would be staying to join in the festivities, so we planned food for the kids and food for the adults, too.  I had gone over the day before to deliver supplies, along with table cloths in pink and green and to tie pink and green tulle to the backs of the chairs. 

The day of, I arrived early to set up and prepare everything before guests started to arrive. Amazingly, the hat craft went really well.  As a teacher, I came across Glue-Dots through the Oriental Trading Company catalogue for foam craft activities and in my opinion they are worth their weight in gold.  They were just the thing for making this activity run smoothly for the 4-5 year old crowd.  We gave each girl a long piece of ribbon and laid out bowls of these flat fabric flowers I bought from the craft store and adhesive jewels. It was a good craft to do while guests trickled in too, since some kids were faster than others, it wasn't going to be done within a set time anyway.  The first ones done were good helpers too.  The moms were very impressed how well they all did and how organized the activity was, so that made my day!

After the hats were done, we set up the chairs outside for musical chairs.  I was under the assumption that all kids knew how musical chairs works, but after a practice round while the birthday girl was otherwise occupied, I was a little concerned.  Luckily, there were no tears and later the parents told me that their teacher would play it with them, however, they were never "out", which  explained the blank stares when we'd remove a chair and had them accompany it to the shady area of the yard where the parents watched the festivities.  My favorite moment was when the first "out" girl said after the game was over "That was so fun!"-I figured if she had a good time, all went pretty well!

While parents helped bring in chairs, I went over some simple etiquette rules with the girls (emphasising the importance of eating fruits, veggies and their sandwiches before diving into the enormous chocolate strawberries).  The parents then brought them over to our tea party buffet and I went around with pink lemonade served from proper teapots into their party gift little teacup. While they ate, I set up the Tea Bag Toss game for anyone who might finish early. My only regret was setting it up inside, there just wasn't enough room, but they liked throwing the yummy smelling tea bags across the room. 

After they got a chance to digest lunch, her dad set up the pinata and they headed out while I prepared cake and ice cream and chased after the mom to make sure she had stopped to get something to eat from the buffet.  The pinata was fitted with a pull-string contraption to lessen the potential hazards pinatas tend to bring in their wake, so each girl picked a string and at the count of three all pulled together.  I had packed it pretty good, maybe too good, so we had to tear into it a bit to get the flow started, but it all worked out.  We had prepared cute little purse gift bags with their names already on them for their goodies, so once they had put that away, we sang and had cake and ice cream.  

It turned out to be a huge cake and there was a ton left over, so I encouraged anyone who wanted to take some home to do so.  Even still, there was plenty for the family to have again for their own celebration later. From that point on, parents started to trickle out with their kids and their party goodies (and even some food if they liked). 

As I started to clean up and break down the party, she opened a few gifts and I again checked to make sure that her mom had stopped to eat a decent meal after a full afternoon of visiting with all the moms (and 1 dad) who had arrived with their kids.  All in all, given how action packed this party was, and the age group, I couldn't have asked for a smoother event!

Monday, July 28, 2008

*Hand-Painted Cross Cake*


First Communion Cake #5- Two-layer cross-shaped vanilla bean cake with Bavarian cream and fresh strawberries covered in white fondant and hand-painted with liquid luster dust to match the invitation.

This cake was for the older sister (and my former student) of the girl who asked for the frog princess cakes earlier in the year (see June).  Her mom had picked a beautiful stained-glass invitation for family and friends and asked to incorporate the colors/design however I could into the cake. I only wished that I had taken a picture of the cake next to the invitation so you could see them side by side.

The background of the stained-glass was various shades of red and pink, and within the framing were doves and grapes. Unfortunately, the cake wasn't quite wide enough around the sides to include the doves, so I recreated the leaves and grapes only.  

To liquefy luster dust, you can use either vodka (I prefer lemon or vanilla flavored) or any kind of extract. You never want to use water because it dissolves the sugar fondant. 

I have to say, it was quite relaxing getting back to painting, I hadn't done any proper painting since my art minor courses at college.  Once I got started it seemed like the world stood still. I hope I get to draw and paint (with edible "inks" of course) again!

*Bible Cake*


First Communion Cake #4- Two-layer quarter sheet chocolate cake with whipped cream frosting covered with white fondant and decorated with fondant accents: pink and purple star flowers, green leaves, a chalice and host, pink fondant bookmark and a plastic opalescent rosary, with a pink "book cover" edging. 


This is probably the most fanciful and shimmering cake I've made to date.  Pinks and purples, varying greens and TONS of luster dust!  My favorite element of this cake has to be the chalice and host decoration.  I was going to free-hand the two, but as I was shopping at the cake store I found a relief of the chalice and host in the Baptism/First Communion aisle and I got a spark of inspiration all thanks to one of my favorite childhood toys-PlayDough.  

When I got home, I practiced with a piece of scrap fondant to see if by pressing the fondant into the relief I would get the desired 3-D effect.  I was ecstatic when every little delicate detail came through! The luster dust helped too by adding definition to make those details shine.  

Finally, I took a page (no pun intended!) from my hero the Ace of Cakes; chef Duff and his team; who do their magic at Charm City Cakes in Baltimore.  About 2 weeks before I did this cake, they were doing a book cake when there was a slight mishap (the airbrush leaked bright pink food coloring down the side of the cake).  But the professionals they are, there was a solution- by dabbing more pink "ink" along the edges, the pages that were scored into the sides of the cake were now visible as the ink settled into the valleys. 

By doing the same with my cake, it added that little something special to a very special day.

Just Around The Corner...The Final First Communion Cake! Stay Tuned!

*Pink Cross Communion Cake*


First Communion Cake #3- Three-layer cross-shaped cake (vanilla-chocolate-vanilla) with chocolate chocolate chip mouse filling covered in pink fondant accented with a white luster dusted cross with pink and white sugar flowers

This was a fun cake to make because it was not only 3 layers but 2 different cake flavors.  I also liked the fact that it was going to be different from the previous First Communion cakes in that it was not going to have a lot of white to it. Finally, it was not a traditional shape either, and wanting to make sure that it would still feed plenty of people, I had to carefully whittle away enough so that it looked like a cross but didn't leave a tiny cake.

I was terribly tempted to cover the whole cross in luster dust just to give it a sparkle factor, but I restrained myself and only dusted the white accent cross. 

Coming Soon... not one but TWO more First Communion cakes!

*Ice Castle Birthday*


Ice Castle Cake-  Chocolate castle-shaped cake with glitter icing gel, white sanding sugar, sugar penguins and rock candy (polar bears were non-edible) on top of chocolate frosting surrounded by white fondant


So a year had passed and the birthday girl who one that first auction cake (see Bow Wow Birthday) was celebrating her birthday again, this time with a frosty theme including polar bears and penguins.  She requested an ice castle cake from me, however she also requested it be chocolate, providing me with a challenge-how to make a dark brown chocolate cake look frostbitten. 

I couldn't frost the cake in white icing because then I would loose all the detail of the castle. I went through many ideas and drafts before shopping for supplies. I was very lucky to find glitter gel icing at my local cake supply store, bringing me that much closer to fulfilling her request.  Turns out the hardest part was finding polar bears, this was April after all.

I was really happy with the way it turned out, for a chocolate cake, it looked pretty chilly! Brr!

Next Up-Back to First Communion!

*First Communion Part Deux*


First Communion Cake #2- Two-layer quarter sheet chocolate cake with chocolate frosting covered in white fondant with blue, gray and purple accents to match with a napkin for the party

Although this cake did not take up the same acreage as the previous cake, what it lacked in length and width, it certainly made up for in height. Again, considering it's been months since preparing this cake and given how ridiculously busy I was at the time, there's a good chance I've confused it's inner contents with the cake afore mentioned. But that's okay, since three-times more work went into the decoration to make sure it matched with their party napkins.

I was lucky enough to find a cross that exactly matched the one on the napkin, which made replicating it in fondant a breeze! Other than the cross, there is little color other than white, save for a few silver gray dots that run the perimeter, made of liquid luster dust!

I love it's pristine white-ness (for lack of a better term) with that pop of color in the cross and writing. What I loved even more was their reaction to my efforts to match that napkin!

Coming Up: The Girls!

*Auction Cake*


First Communion Cake #1- Half-sheet two-layer chocolate cake with vanilla frosting covered in white fondant with gray-blue accents and white royal icing piped with lettering from First Communion invitations

This cake was one of two offerings to the auction that my former school put on every year with their golf tournament. The other was a cooking party (future post to come!). Let me start off by saying...this cake was HUGE! It was a half-sheet cake, the biggest cake I've made to date, but the picture doesn't do it justice.

I'll be honest, I was so super busy at the time of making this cake (just finished a baby shower, a birthday cake and had an additional First Communion cake that same day, PLUS I was coaching softball at my former school-whew!) that I'm not completely sure this cake was the chocolate/vanilla cake or if it was a chocolate/chocolate cake. Regardless, the highlight wasn't the frosting, it was the cake. I used Ghirardelli chocolate in the cake batter-YUM!

Since there was no carving or shaping involved, the detailing came with matching it to the invitation paper his mom used and incorporating it into the design. I used the background color (blue-gray) to break up all the white fondant with edging and the cross as a centerpiece, accenting it with, what else?, luster-dust! Then I piped the phrase from the invitations "A Blessed Event" separated with mini crosses all the way around the cake. Also, there are larger white crosses (dusted with luster) on each corner.

Turn the page for more First Communion Cakes!

Monday, July 14, 2008

*Vroom, Vroom!*


Lighning McQueen Cake: 2-layer vanilla cake with vanilla buttercream frosting decorated with fondant cut outs, luster dust and blue glitter decorating gel

Cars is one of my favorite Pixar movies so I was very excited to make this cake for a 3 year-old boy who was having a Lightning McQueen themed party.  The most challenging part was making a stationary cake look like it could burn rubber off the kitchen table.  I was particularly happy with the eyes-adding just a little bit of flash with blue glitter decorating gel. 
As far as I'm concerned, Pixar can do no wrong-what's not to love about characters like Buzz & Woody, Sulley & Mike, Marlin & Dorey or even Remy & Linguine? With the new arrival of Wall-E, Pixar adds yet another endearing character to their list...anyone planning on throwing a birthday party with a Wall-E theme? (hint, hint)  

Wednesday, June 11, 2008

*Bouncin' Baby Shower*


Dessert:Vanilla cupcakes with yellow and green vanilla buttercream frosting and sprinkles

Sandwiches: Turkey & cheese, PB&J (strawberry and grape) and tuna, cut with cookie cutters

Finger Jell-o: Peach, Orange, Lime and Lemon cut with baby-themed cookie cutters

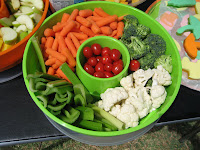
Fruit & Veggies with ranch dip

All these cute goodies were for a friend's baby shower a couple of months ago. She and her husband didn't know if they were having a boy or girl so we went with a neutral color scheme of green, yellow and orange. Actually, it was part baby shower and part open house held at a park for friends, family and the kids and parents from her swim school. There was even a bounce house set up! 

Now the food items are pretty self-explanatory, but one thing that amused me was the novelty of Finger Jell-o. Apparently, it's something completely foreign to Southern Californians because when I made it for another event just last month, again it was met with amazement by the guests. In my family, my mom's Finger Jell-o popped up at every holiday and special event!  It's the simplest thing to make, it's just 2 steps more than making regular Jell-o. Green shamrocks for St. Patrick's Day, pink hearts for Valentine's Day, orange and green pumpkins for Halloween, and when they started making blue Jell-o, she would make the 5-layer version in stars of red, white and blue. 

I can't imagine a childhood (or adulthood for that matter) without Finger Jell-o, so I guess it's up to me to make sure the kids in SoCal will have the chance to discover how fantastic it is! 

*The Frog Princess*


Frog Princess Cake: 12" round, 4-layer vanilla cake with vanilla buttercream decorated with fondant and food coloring pen

Hoppy Birthday Cake: 8" round, 2 layer vanilla cake with vanilla buttercream decorated with fondant, food coloring pens and luster dust


The first cake was a special request by the birthday girl herself-a Frog Princess! The second was just for fun, due to the fact that I had left over batter and couldn't let it go to waist. I wanted the family to have another cake to take home for their own family party the next day so that they didn't have to take a half-eaten cake home from Chuck E. Cheese.

I had recently found the most delectable vanilla cake recipe out of a cupcake cookbook and thought I'd just up the amount to see how well it hold up as a cake. It was light and moist with a true vanilla taste to it, unlike white or yellow cake. As a self confessed "choco-holic", I have chocolate cake recipes to die for, but an amazing vanilla cake proved to be rather elusive so I was thrilled when this new recipe worked out so well!

The frosting both inside and out was a rich vanilla buttercream, making this a supreme vanilla cake. The only drawback is that because of it's airy texture, it doesn't carve well, so I had to keep most of this 4-layer cake intact. All the accents on the frog princess were from rolled fondant mixed with various food coloring gels, with a little food coloring pen for the eyes and diamond-shaped sugar decorations for the tiara.

The second cake was also a vanilla cake with vanilla buttercream frosting, but on a much smaller scale. It was just a lot of fun to put a bunch of hopping frogs and flowers (with my favorite decorating item- LUSTER DUST!) around the sides with whimsical yellow and green fondant decorations across the bottom. I couldn't resist putting "Hoppy Birthday" at the top!

Sunday, June 8, 2008

*Cute Bunny Cakes*


Mini-Bunny Cakes: Yellow cake with food coloring, sugar glaze coating decorated with gum drops, hard candy decorations (found in baking aisle) and green YoGos Rollers

Hoppy Easter! Now that there were more little ones in our family, I thought it would be fun to dress up this year's Easter dessert and have some fun with it. Besides, the chocolate covered bunny from last Easter (see Post-April 2008) was going to be very hard to top, so when all else fails, go cute! And to up the cuteness, I made each batch of bunny cakes different colors, just like Easter eggs! This added more fun to dessert because you couldn't tell what color your bunny was until you took the first bite. My family was convinced that the colors were also different flavors and I spent most of the evening trying to get them to understand that the color was not flavor related. My family is a riot!

The eyes and noses were those little round sugar decorations that you can get at the store in the baking aisle, ears were made from flattened gum drops (boy was that ever a sticky mess) and the "bow ties" were a striped fruit roll-up type snack. To get each bunny's refinements to stick, I drizzled a sugar glaze over each one. Funny thing was, after they got their sweet coating, they looked just like glazed donuts! They were the cutest bunny donuts we ever had for Easter!

Saturday, June 7, 2008

*Candy Cane Lane*

Crazy Candy Cane Cake: Yellow bundt cake with red center layer, white candy drizzle and candy canes


This was just a cake (well, actually I made 5 of them) I whipped up for my former students and colleagues for Christmas 2007. Bundt pans make such great shapes, and now more than ever with the variety of whimsical shapes coming from NordicWare these days. But I went "old school" using the traditional shape...with a twist-a peppermint twist!

After watching my mom over the past 25+ years make her cinnamon swirl cake for Christmas morning, I thought, why not mix up a yellow cake by adding food coloring? So I separated 1 cup of the prepared batter, added red food coloring, alternated layers in the pan, brushed the finished cake with a little peppermint extract and shoved about 3 dozen candy canes in the hole in the middle of the cake! Ta-Da...it's Crazy Candy Cane Cake!

*Happy Holidays...From the Kitchen*


Holiday Cookie Party:
Stained Glass Cookies-sugar cookies cut with a matching open "window" and filled with crushed Jolly Ranchers and peppermint candies

Oatmeal Kiss Surprise Cookie-Oatmeal cookie dough with "surprise" Hershey's Kiss/Hug tucked inside and rolled in decorative sugars

Gingerbread-Pre-baked gingerbread cookies for decorating with royal icing and a multitude of candy decorations and sprinkles to choose from!

Although there weren't any pictures I could post here for the Thanksgiving Feast project with a group of 5th Grade Girl Scouts, it's a day none of us will forget! In order for the girls to fulfill their requirements for their nutrition unit, I planned opportunities for them to make healthy fruit smoothies, grilled veggies, homemade dinner rolls from scratch, mini pumpkin muffins (shaped like little pumpkins!) and a frozen yogurt pie for dessert. We also went over all the "Rules of the Kitchen", including egg safety, cooking temperatures for various meets and safety tips for using knives, ovens and stovetops. After all the food was ready, we set the table, complete with a centerpiece using a runner with quotes for giving thanks written with fabric pens. I left the pens out so they could add their own Thankful Things to our centerpiece. We lit the candles, said "grace" and the girls feasted on all their hard work-and the baked chickens I bought from the store.

I had another opportunity to work with a younger group of Girl Scouts, the 2nd Grade Brownies, for a Christmas Cookie Extravaganza in December. The troop moms and I decided upon 3 hands-on cookie recipes that were fairly easy and really unique; Stained Glass Cookies, Oatmeal Kiss Surprise Cookies, and Gingerbread (because you can't have Christmas cookies without Gingerbread!) I pre-made each of the doughs, pre-cut the Stained Glass and pre-baked the Gingerbread and placed them on trays so they would be ready to go for each group as we cycled through the stations. In case anyone whipped through their station lighning fast, we had a cute Gingerbread Kid Christmas tree decoration craft station and another table set up for them to decorate their take home box with some foam Gingerbread House stickers.

The girls did an amazing job with the cookies, each tray was as unique as they are. But the best part was seeing their anticipation and then excitement once their masterpieces came out of the oven. And the smell......mmmmmmmm! The whole house was alive with Christmas Spirit! Not only did they go home with a box of homemade goodies to share with family and friends, they left with a lot of great memories, too!

*All-Star Cookie*


All-Star Cookie: 12-inch chocolate chip cookie with red, white, blue and green frosting

These enormous pizza-sized cookies were a blast to make! Thank goodness I paid attention in math class or designing the soccer pattern would have taken me all day-whew! But who doesn't love the idea of a humongous cookie as a birthday cake? The small star tip I used to pipe the red and blue frosting added an "All-Star" touch to this cookie cake. This is a unique alternative to a typical birthday cake, especially for those who don't want a cake dripping in frosting, but still want something super yummy!

Goooooooaaaaaaaalllllllll!!!!!!!!

Monday, May 12, 2008

*Pool Party*


Flip Flop Cakes: 2-layer 11x15 butter cake (carved into 2 flip flops) with fresh whipped cream and sliced strawberries and vanilla buttercream frosting

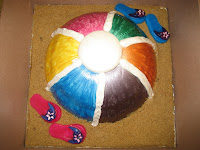
Beach Ball Cake: 3-layer half dome butter cake with fresh whipped cream and sliced strawberries with vanilla buttercream frosting and covered in fondant "painted" with Luster Dust 

Ice Cream Bar: Vanilla ice cream, crushed graham crackers, crushed Oreos, mini M&Ms, crushed Crunch candy bars, mini caramel cups, gummi bears and rainbow sprinkles

What a great way to end the summer with a bang -a Pool Party!  This party was for a 10 year-old girl who's birthday came just a few days before the school year started.  With the weather skyrocketing to record temperatures, it was a great idea to invite her friends to share the breezy shade and cool waters of her family's amazing backyard.  

If you are wondering why there are two cakes, the beachball cake was for a smaller party with just her friends and the large flip-flop cakes were for her family party. Both were a rich butter cake (like poundcake) with fresh sliced strawberries and homemade whipped cream filling. The flip-flop cakes were covered in yummy vanilla buttercream and the beach ball cake had a layer of sugar fondant that I hand painted with Luster Dust mixed with lemon extract, with a little royal icing for decoration.  Both cakes are sitting on a mixture of dark and light brown sugar posing  as "sand".  

Also featured at the party was an ice cream bar, where the guests could mix and match their own toppings (gummy bears, crushed Oreos, mini M&Ms, broken Crunch bars, sprinkles, graham cracker crumbs and mini chocolate caramel cups) with vanilla ice cream.

Decorating such a great backyard was so much fun-all the tables were covered with a "Scene Setter" ocean background, along with beach themed streamers at the corners, springy mylar spirals hanging from the underside of the upstairs patio, a cute pair of balloons with a little girl and a little boy in their beach gear and the piece de resistance-a pool full of beach balls! I ordered over 3 dozen beach balls of various sizes which brought that extra touch of whimsy and fun to the party.

Each of the children at her party went home with a great fold up beach/picnic mat and a personalized waterproof tote. It was a great idea for a more practical "goodie bag" treat but that would remind them of the fun they had at her party every time they used it.

This was the first full-blown party I had the opportunity to plan and it was a blast!  I only wish I could have stayed to take a dip in the pool...

I know Summer is still a month away, and here in Anaheim right now the weather couldn't be farther from the sunny skies of June/July/August, but I wish you all a Happy Summer and many fun hours around the pool!