CLICK HERE FOR THOUSANDS OF FREE BLOGGER TEMPLATES »

Monday, August 3, 2009

*Here Comes the Bride!*


Bridal Shower Cake-  Corset/Bustier Shaped 2-layer chocolate cake, filled with strawberry preserves and vanilla frosting, covered in "skin" colored and white fondant, with pink and white flowers and pink lace patterned fondant detailing.

So this is my first "va-va-va-voom!" cake, and I can confidently say it was the closest I've ever been to working at the Barbie factory. As this cake went through it's stages, it reminded me of the Barbie head my cousin had when we were kids, you know, the kind that you can put make-up on and style it's hair. It particularly made me giggle when I would take a break away from it, only to see something in my kitchen that looked not unlike a headless torso-it can be rather shocking!

I'm sure you're wondering about the "busty" part, that was achieved with the help of my Wilton Sports Ball cake molds. I've used them before (See- Play Ball!), but this time I filled them to the brim to so that it would look more like the Bride-To-Be...let's just say she's very blessed in that department!

The challenging part of this cake was pulling off the look of lace, without having to fork over hundreds of dollars for fondant molds via the interweb. My final solution was to buy paper doilies and roll them into the fondant and cut them out. I layered them for depth and, of course, showered them with pearl Luster Dust. For the front lace piece, I found a website that detailed how to get that look using a lace place mat and a stencil sponge with Luster Dust. I looked everywhere for a lace placemat to no avail, so I had to improvise with a handkerchief with a lace edge. It proved to be slightly problematic, but after a false start, it worked out pretty well. I do have to say, it's more impressive with a darker hue of Luster Dust, but I'm happy with it.

Having not yet mastered (or even tried for that matter) creating my own sugar flowers, I opt to purchase them from my local cake supply store. They're always beautiful and I know it saves me from pulling my hair out. I love the flowers I picked up this time because they came with those pretty pearl accents. I did add, what else, some of Wilton's version of Luster Dust to the edges of the little white flowers that curve along the top. After pushing them into the cake, I topped them off with a tiny dot of white royal icing.

Oh! And before I forget, the bow and the garter are simply decorative....I'm not that good! Other than that, everything else is edible, and DE-lish!

Monday, July 20, 2009

*Cake Walk...version 2.0*


*Build-A-Bear School Cheerleader Cake* -bear shaped vanilla bean, butter cake with vanilla frosting, cocoa glaze with turbinado sugar coating, decorated with red, white and blue fondant and festive foil party picks for pom-poms


*Notre Dame Stadium/Touchdown Jesus Cake* -chocolate stadium cake decorated with blue and gold sparkle piping gel and blue and gold sugar sprinkles, fondant field, ND emblem, walkways and trees decorated with luster dust and a hand-painted "Touchdown Jesus" on gum paste in the end zone.


First, the Cheer Bear cake. Yes, the Build-A-Bear cake makes a return visit to my modest kitchen (see Ho-Ho-OH! November '09). I know, I know, I was a little...well, thrown last time this pan was used, but it's all a learning experience, so this time I was prepared. Right? Sort of. As this pan has been discontinued and impossible to find info on via the interweb, the cheerleader costume was completely custom made. And a real 'bear' to construct without the aide of helpful templates like the ones provided in the kits sold at Williams-Sonoma. But I thought this time would be different because I was using their cake recipe from the box and was confident there would be no cracked tails or missing ears once unmolded. I followed every direction to the letter, but it's cake, and I'm going to have to learn sometime cake will always win.

Luckily, no broken ears and the tail was intact-yippee! But to my shock and horror, the neck was not very sturdy on one side and there was a crack...a CRACK?! So I froze the cake in the hopes it would magically glue itself together. Little did I know that trying to frost a frozen cake would spell T-R-O-U-B-L-E, especially one that needs to stick together seamlessly. Trimming that cake while still in the pan when there wasn't enough batter, it just doesn't work. Frosting Try #2 came only after the fast frozen stuff was scraped off and the bear went under the knife. Then suddenly, it all came together, even the neck, crisis averted!

Dressing the bear was another challenge, but after learning to pleat fondant with the best of them, I thought I'd have a little fun and try a technique I saw in a very fancy cookbook I have called The Flour Pot Cookie Book by Margie and Abbey Greenberg. In the book, they show how you can embed rolled fondant with fondant cut-outs into a kind of wallpaper pattern. Once the pattern is complete, you can cut out whatever shapes you need with a cookie cutter or knife and use to decorate cookies or cakes with an extra fun flair! I know it's hard to tell from this picture, but this cheer bear's bow has paw prints on it...adorable! And who doesn't love a little shine and sparkle-RAH, RAH!

The second cake, a replica of Notre Dame's football stadium, came with a challenge of it's own-a request for a "Touchdown Jesus" to go with it. Now, I've gone to Catholic school my whole life, even stood in with my high school band for the Fighting Irish when their band couldn't make the trip for a ND v. Stanford football game (Go Cardinal!), but I had never heard of a "Touchdown Jesus". So research was in order.  Imagine my surprise when it turns out that it was actually a mural on the campus library that can be seen from above the stadium near the end zone. It's really quite impressive, see for yourself! Since the cake itself didn't require frosting or fondant, it was nice to have the painting of the mural to spread my artistic wings. Just in case you are wondering, the nickname for the mural has to do more with the position of His arms than the location of the mural to the stadium. Either way, I think it's just hilarious!

Thank you Google Images!!!

*Play Ball!*


                                                               *Click To Enlarge Images*

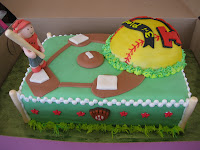
*TNT Softball Cake*-2 layer chocolate cake with vanilla frosting, decorated with green and brown fondant, a mini cake softball in fondant with luster dust and fondant design, and assorted baseball decorations (sugar, fondant and plastic), complete with gum paste softball player 

*NY Mets Baseball Cake*-2 layer chocolate cake with vanilla frosting, decorated with green and brown fondant, a mini cake baseball in fondant with luster dust and fondant design, and assorted baseball decorations (sugar, fondant and plastic), complete with gum paste baseball player 


The Great American Past-time....Baseball! I have adored baseball since the first time my grandparents took my sister and I to freezing Candlestick Park in San Francisco when I was 8 years old. And, let me just tell you how lonely it can be to be a Giants fan near Dodgertown, not to mention the year I moved south was the year the Anaheim Angels (yeah, I said it, ANAHEIM!) beat my beloved Giants in the 2002 World Series. Oh, but one day I will have my revenge!

Anyway... if I can be involved in anything baseball related, I'm more than thrilled to try and knock one out of the park. A former student and her brother needed cakes for their end of the season parties and I have to say, the ideas for these cakes came rather quickly. For as similar as these cakes were, there were enough individual touches to make them each unique. It's easy to be motivated when you love what you are doing!

There were so many things to like about these cakes, but I have to say, my favorite has to be the little gum paste players. Having never worked with gum paste, I was excited to see what this medium brings to a cake. It was interesting, but I think the jury is still out until I've practiced with it more.  But, gosh, aren't they cute?


*Celebrate It All!*


Chocolate Lollipops-shaped like a certain famous mouse in cute red shorts!

It's no secret I'm a HUGE Disney fan, and although I own not only the pancake/egg mold and a cookie cutter with Mickey's silhouette, I decided I could "wing-it" when creating a little treat for a friend who was performing in a Disney fundraiser show. 

I've been taking more baby steps into the world of homemade chocolates, and this was by far the biggest plunge. I'm pretty proud of the fact that they turned out well enough to give as a gift, however, I think from now on, I will stick to dipping treats in chocolate. I'll leave the real chocolate making to the true professionals, like Willy Wonka.

"What will YOU celebrate?"

*That's A Spicy Meatball!*


Spaghetti & Meatballs Cupcakes- chocolate cupcakes with ivory tinted frosting, with grass piping tip, topped with sparkle red decorating gel and small chocolate decorations

Mama Mia! These might be the cutest cupcakes I've made to date! It was in honor of the first of the last Williams-Sonoma cooking classes I would be attending this past spring. Can you guess what that night's theme was? Why Italian cooking, of course! And, I was in need of a baking project, so I whipped together these little treats just for fun.  It's the portable version of the spaghetti cupcakes from one of my favorite cookbooks Hey There, Cupcake! by Clare Crespo

Slightly off topic, but if you find yourself anywhere near Brea, CA and the desire to join a cooking class strikes, do yourself a favor and sign up for a class, hosted by Jonathan, of course! It's the best time you'll ever have, and you get 10% off your purchase that night! Can't beat that with a stick of butter...

*Super Duper Bowl*


Stadium & football shaped chocolate Brownie cake, dark chocolate ganache, sprinkles, decorating icing

I got invited to a Super Bowl party, and since I haven't cared for NFL football since the dynasty that was the Bill Walsh-era San Francisco 49ers, I busied myself with dessert! It was all sort of last minute, but as you will see in a future post (see ND/Touchdown Jesus cake), it was great practice. 

More than that, I learned a valuable lesson that day, the Wilton sports silicone baking pan gave off an awful smell and has since been relegated to the back of the baking closet until I can figure out why. And, yes, it really is a closet o' baking stuff...it's been ages since all my baking stuff would fit in the kitchen!


Baking pans, cookie cutters and cookbooks....oh MY!

Thursday, January 29, 2009

*It's A New Day*


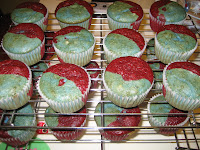
*Inaugural Cupcakes* White cake mix tinted with blue gel food coloring and Red Velvet cake mix, topped with store bought vanilla frosting mixed with red and blue food coloring and red, white and blue sprinkles and candy decorations.


It's official, my boredom has sunk to a new low. No news on a "normal" job, just the occasional substituting job at the local elementary school and no orders for cakes or birthday festivities to keep me busy with everyone lacking in fundage for all things frosted.  So, what's a girl to do? BAKE CUPCAKES!

I can think of no better reason to celebrate with cake than the inauguration of our 44th President (whom personally helped get into office...Hey! I have the "I Voted" sticker to prove it!) So a couple days before The Day, I set out gathering as many red, white and blue decorative food stuffs for what I imagined would be the most patriotic and inspired cupcakes in my baking history. Well, at least in effort and color.

I picked red velvet cake mix because I could skip the endless dropping of red food coloring just to get a deep pink. Ugh! Little did I know that it's just as annoying to turn white cake mix blue.

In the interest of bi-partisanship, I thought, why not make them half-and-half? What fun to bite into the cupcake and see such vivid colors! I figured if I just poured from my wonderful pour bowl set from Williams-Sonoma, this would be a cinch! 
And then the phone rang....
20 minutes later, mom and I stopped chatting because I told her the batter was going to start crawling out of the bowl if I didn't get them sorted into paper lines, like now! This added an element of suspense as I struggled to get the white(blue) cake mix to flow as well as the red velvet, because it was now more like pancake batter and full of air. There was more batter on the tins and on my counters than there was  in the paper liners! At least my kitchen was looking patriotic...

The first batch came out a little more well done than necessary (as evidenced by the dark tops here) 
but I didn't stress, they were going to be gloriously topped with frosting and edible confetti fit for such an occasion!
Well, my heart was in the right place, but my decorative inspiration was more 123 Sesame Street than 1600 Pennsylvania Ave.  If you ask me, the world would be a friendlier place if everyone would just share a handful of M&Ms with someone, so why not let them star atop the cupcakes I created because, thankfully, "It's A New Day"


Best Wishes To You in 2009!

*Ho-Ho-OH!*


*Build-A-Bear Santa*Vanilla cake (mix) with vanilla frosting, decorated with cocoa powder glaze and brown sugar and fondant "outfit" trimmed with vanilla frosting.


Ah, Williams-Sonoma, if I could, I would set up residence inside their hallowed halls! Don't be surprised if someday you come to this site and an "Ode to Williams-Sonoma" is there to greet you on the first page. From cooking classes (permit me a shout out to the chef at my local store-Hi Jonathan!) to their multitude of whimsical baking pans (many courtesy of NordicWare)...there is nothing I love more than receiving a "Golden Ticket", or more of a bronze-ish one, to shop in this culinary wonderland.

My family is fully aware of my, a-hem, addiction, to this store, and let's just say, it's good times had by me at Christmas! Now it should be noted that I had a small stint at the Downtown Disney Build-A-Bear store after deciding it was time for a break from teaching. I wish I could say it was all that I hoped it would be, I guess it was the teacher in me that expected more from a child-centric store. So it's understandable that when W-S came out with their Build-A-Bear cake pan (there would be a link here, but alas the pan has gone by the way of the collectible-check ebay!), it wasn't one I would have run out to buy, but would more than likely ended up in my arsenal sooner or later. Sooner was an understatement!

Arriving by train this year to my parents house for the holidays, my mom could barely stand it when gifts from my cousin arrived, with the ominous words "OPEN BEFORE CHRISTMAS" pasted on one bearing my name. After an entire day of traveling, and desperately hoping for a blissful night's sleep, I promised I would open it first thing the next day.  Unwrapping the small box while my mom was out, I was bewildered by the decorating kit for a Build-A-Bear baking pan I did not own. 

So when my mom returned I asked her if my cousin assumed that I already owned the pan, she said she didn't think so and then we both pondered for a while.  I asked her if there were any other gifts in the bag for me and she said yes, but that it didn't say "OPEN BEFORE CHRISTMAS"-we're sticklers for rules at Christmas.  Knowing how well my well-meaning mother sees, I asked her to double check, and sure enough, the other package was similarly labeled. Instantly, I knew what it was.

I was touched that they would bring my past employment history and love of W-S together for an endearing gift, but was concerned over the timing. You see, I spend each Christmas season baking up a storm, dozens and dozens of cookies for family and friends, I was worried a Build-A-Bear Santa was expected to be on display for our Christmas dinner. So everything went into 5th gear and I sped toward the finish line in the hopes of getting around to this cake. 

Additional pressure lurked because I knew that his little girl, who had received her first Build-A-Bear (courtesy of moi) within days of her birth, would now be old enough to notice if it wasn't there adorning our "Kids Table". Never mind the fact that she was the true reason we could continue calling it the "Kids Table" being that it was now filled with 30-year olds-I had to represent for the toddler set.

In my haste, I wrongly assumed that the decorating kit was full of pre-cut fondant "clothing" ready to be assembled on the completed cake like a puzzle. Note to by beloved Williams-Sonoma....you might want to think about that for next time! Not being at my own place with all my fantastic fondant and decorating tools I was forced to use the same rolling pin that mom uses to bash enormous bags of ice from the supermarket and store bought icing tips. YIKES! Let's just say, thank goodness our family wasn't expected at the house until 3 p.m. Christmas day because I finished the cake at around 1:30.  With no major limbs lost in the assembly (not counting the separating legs and a cracked tail), I'd say this was a successful cake!

Even after all that stress and strain....he sure was cute...don't ya think? 
Man, they're good, Build-A-Bear got me again! 
Perhaps I'll make him a leprechaun for St. Patty's Day?

Ho, Ho, Ho! Merry Baking!

*Farewell to the Felt*


*Pool Table Farewell Cake* 
Pool Table: Vanilla cake, with chocolate buttercream icing covered with chocolate fondant around the edges and green-blue tinted fondant (as the felt) and little black fondant pockets. 

Billiard Balls: Sugar-glazed doughnut holes covered in white fondant, painted with gel food coloring and vanilla-flavored vodka.

Pool Cue & Chalk: White fondant tinted and rolled with ivory and brown gel food coloring (for a "wood" look) and chocolate fondant at the end and the tip-dusted with blue Luster Dust for "chalk". White fondant tinted black and turquoise for the chalk cube.


It seems just yesterday that we were putting her baby shower together (see June 2008 *Bouncin' Baby Shower*) and now that little bundle of joy is becoming mobile!  In order for her parents to chase her down as she revs up to chase the dogs, the pool table was being evicted to the garage, so a farewell party was planned.  And you can't have a farewell party without CAKE!

Miraculously, I whipped up this cake in about 6 hours, split between the night before and the day of the party. (I'm sure someone out there is saying, "yeah, it looks like this was thrown together in 6 hours....but I don't care, the cake wasn't for you!)

The doughnut holes were the best part (and most time consuming), I thought it was such a coup to have the whole cake completely edible-even if the billiard balls were a tad disproportionate to the pool table.  Just in case anyone is wondering...yes, I know there are more than 10 in a complete set, I did make all 16, but only 10 (plus cue ball) fit on the cake, so there.

Sure, if I had thought to bring a cake to this party sooner, I would have added little extra touches (like pockets with fringe and those diamond markers that go around the edge of the table), but I thought this cake was really cute! On a cuteness scale of 10 being the Bow-Wow Birthday cake (first post) and 1 being the Eye Scream Cupcakes (see December 2009), I'd have to say that this cake is up there with Little Orphan Annie & Sandy cupcakes (see August 2008) and the Build-A-Bear Santa cake (future post!)

Farewells are never easy, even if it's only geographic, so to soften the blow, why not immortalize it in cake! My next farewell tribute might have to be for my own party, as I have a super cute pair of Steve Madden peek-a-boo flats that need to be put out of their misery...

Rack 'em Up!

*Gift of the Baking Magi-Eggnog, Pumpkin & Zucchini*


*Christmas Bread Brownie Activity-December 2008*

Vanilla Eggnog Bread, Spiced Pumpkin Bread and Chocolate Zucchini Bread (mini-loaves)

Activities: Bagging up mini-loaves in decorative cello bags and labeled, assembling recipe cards, and foam Christmas tree ornaments

Tis the season to bake with the Brownie Troop...Fa-la-la-la-la...La-la-la-la!  This activity is quickly becoming a yearly event, and a great way for me to keep up with how things are with the kids in the last class I taught at my old school.  The noise level is usually at a fever pitch from the moment they walk in to the moment they leave with their goodies because we're all so busy finding out what's new.  

Feeling the pinch from the recent economic down-turn, I thought it was important to incorporate a lesson in sharing with this year's activity.  So I planned to bake simple bread recipes with them, allowing for 1 loaf to take home to their family and one to share with another family. Due to time (and kitchen) restraints, I baked off one whole batch of each loaf prior to the day's events, leaving each group of girls to bake the second batch that afternoon. 


Since most of the time spent together would be waiting for the breads to bake, we planned activities such as bagging and tagging the already baked breads, gluing recipes to holiday cardstock and an ornament craft for their tree at home.
Given how busy the girls were, I'm actually amazed we only had one hiccup-an unfortunate sacrifice of one batch of chocolate zucchini breads to the Saint Elizabeth, the patron saint of bakers.  I think that I will have to be a little firmer about the noise level and express a need for focusing on the task in front of them rather than arguing over who gets to do what. But all in all, things went very well and we finished the day only 6 loaves short (which were going to be gifts for the Brownie Troop leaders & helpers). More unfortunate was how quickly the troop leader's house went from smelling of Christmas to swirling with smoke as the offending batch was mixed with little, if any flour, and so bubbled and burned with the fury of melted sugar.

As fast as the prep time went before they arrived at the house, we were already saying goodbye as each girl was loaded up with 1 finished loaf, bagged and tagged, a recipe card and their ornament with the promise that they would receive the second loaf the next day as they were just out of the oven and too hot to handle.  It was fast and furious, but, as always-FUN!
Hmmm...I wonder what next year will bring?

*Happy Holiday Baking!*

*You Scream, Eye Scream!*


*Eye Scream Cupcakes* Dark chocolate cupcake filled
 with raspberry jam and a gummy eyeball topped with dark chocolate frosting and Halloween sprinkles (ghosts, bats, pumpkins, purple, orange, green, black and white "Jimmies" and Halloween sugar decorations.

*Lil' Devil Cupcakes* Devil's Food cupcakes with red Holiday Oreo in the middle, topped with red vanilla frosting and sprinkled with crushed Holiday Oreos and red sugar sprinkles. 

These cupcakes were specifically ordered with the intent of creeping out the group of 10-year old girls they were ordered for during their Halloween Sleepover.  The ones with the gummy eyeballs in raspberry jam tucked into the center were pretty scary too (ha ha!).  

For the "Lil' Devil' cupcakes, I had fun with the frosting, for my own entertainment mostly. It's what I imagine a Troll doll version of the horned red fellow who drags around a pitchfork might look like. 

In case not all in attendance enjoyed their cupcakes looking back at them, I also whipped up a batch containing a hidden jem-a ragin' red "holiday" Oreo cookie. They used to make the cream orange for Halloween, but with the economy in a downward spiral, I guess they figured to skip Halloween and go right to the red Christmas version. Luckily for me, America being so eager to get Christmas merchandise into the stores, Christmas Oreos were available mid October...

I have to admit the inspiration for the eyeball cupcakes came after my millionth trip to the local Target (a.k.a. Home Away From Home) for Halloween accessories for the apartment. While perusing the Halloween "food" isle, I came across ice cube trays that came with gummy eyeballs, which in my humble opinion is a Heimlich Maneuver waiting to happen. Needing ice cube trays, I figured I could find a better use for the ocular gummies, and "Eye Scream" cupcakes were born. I think next time around, I'll up the amount of raspberry jam, poor eyes were a little dry!

Eye'll Be Seeing You Next Halloween!